
When I started this blog...I wanted it to be a place for me to remember all the things that make me thankful to be alive. I also wanted it to be a place to share creative ideas, and show people how to make things that I love to make. Well I am keeping up the first part....big huge fail whale on the second. Soooooo, that changes today. Last year I saw some christmas trees at...ummmmmm....Hobby Lobby...maybe Michael's that were covered with little loops of ribbon. I thought they were adorable, but not really my style (too much maroon and gold). So I bought some styrofoam trees and made my own. As you can see I chose a slightly less traditional set of colors.
 |
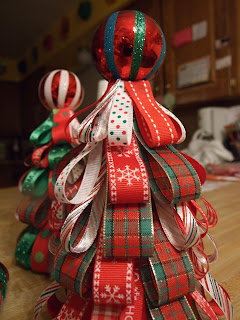
| Here are the trees that perch in my kitchen. |
Step 1: Get your supplies
 |
| Fabri-Tac - found at Michael's, Hobby Lobby and Jo-Anns |
- Styrofoam trees - I like these in groups of 3, but you could do one like this and then make others in another style.
- Fabri-Tac - the best glue EVER!
- Ribbon - thin (3/8 inch), medium (5/8 inch), and large (7/8 inch) width in colors that you love!
- Plastic Ball Ornaments - you can use glass, but they will make your tree a little top heavy.
 |
| tiny ruler from when I worked for an Optomotrist |
Step 2: Measure and cut the ribbon - you will need three sizes
- 6 inches
- 5 inches
- 4 inches
 |
| Ribbon from Michael's...they were having an AWESOME sale |
Step 3: Make loops out of each piece. This may take a while, but making all the loops first makes putting the tree together go much faster. I used a glue gun for this step...and I have the blisters to prove it!
 |
| first 2 rows...keep an eye on your pattern |
Step 4: Start at the bottom of the tree with the largest loops. Put a small amount of Fabri-Tac on the glued part of the loop and attach it to the tree. After making a few of these I started wrapping a piece of ribbon around the bottom so the styrofoam wouldn't show. The one pictured is before I figured this out. Just work your way around adding loops. I also drew a line around the tree to keep my rows at least sort of straight. My first tree had almost a spiral effect because I obviously cannot eyeball a straight line. When adding the ribbon use different thicknesses in the same row. The pattern is entirely up to you. Let your creative spirit run wild. That was my favorite part of making these.
 |
| small and medium are finished in the background |
Step 5: Keep adding rows. Make each row a little closer together. I would say a tall tree needs like 2-3 rows of the largest loops...then move to the medium loop...2-3 rows of that...then move to the smallest loop...you guessed it 2-3 rows. The smaller trees need fewer rows and on the smallest tree I did not use the large loops at all. This part is sort of monotonous...but pay attention to how you attach the ribbon. As you move from row to row I tried to make sure I didn't end up with the exact same ribbon directly above each other.
 |
| see..it doesn't have to be a perfect hole |
Step 6: Once you have completed the ribbon part make a small hole in the top of the tree. I used a butter knife. No kitchen utensil is safe from my crafty debauchery
 |
| ornaments - purchased after christmas last year |
Step 7: cover the hanger end of a plastic ornament with Fabri-Tac.
 |
| fits nicely |
Step 8: Place the ornament hanger side down int he hole at the top of the tree. Now I need to tell you the glue will sort of melt the styrofoam tree. I worried a little about if I was maybe turning the styrofoam into nepalm, but none of my trees burst into flames so I think this is fine. I know my tree doesn't have all the ribbon finished, but I wanted to show you with out the distraction of ribbon.
 |
| aren't they cute! |
Step 8: Becasue the glue does seem to melt the styrofoam a little, you can kind of mold the ribbon and tuck it all under the ornament. So even if I did make napalm...it made this project easier to finish.
Step 9: Complete all these steps on how ever many trees you want in your forest. Like I said I love these trees I think they are soooooooo fun! I thought I had a photo of the trees I made for my house but it is not on this computer...I will go look and if I find it I will add it later.
WhooHoo...first tutorial down. I hope it was easy to follow and it is a project you think is worth trying. I promise to add more...as we get closer to the holidays. I plan on making all my christmas gifts this year...so I should have tutorial opportunities galore!
love and sunshine,
Sarah
If you found this and you liked it please click follow above. (above as in below the name of this blog "Colorful Conjectures of a Crafty Mom" and off to the right...it is kind of small!
If you found this and you liked it please click follow above. (above as in below the name of this blog "Colorful Conjectures of a Crafty Mom" and off to the right...it is kind of small!
How cute! I love these!
ReplyDeleteThese trees are fabulous and your instructions are easy to understand. Thank you.
ReplyDeleteLove these, thanks for the tutorial!
ReplyDeleteThis comment has been removed by the author.
ReplyDelete